In this guide
1. Decide what should share a voice
If you explain the same audience and tone every time you create, a Space can remember that context. Think of it as a home for a recurring brand, client, or content pillar.
You do not need a Space for every video. A tech tips series for beginners could share one Space even when each video covers a different device. A client brand with a different audience and tone deserves its own.
Start with one Space for the work you make most often. You can add another when there is a real difference worth preserving. If you are trying a one-off idea, you can keep it outside a Space.
2. Describe the audience and the voice
Open Spaces and choose Create your first Space if you have none, or New Space if you already have one. You can also create a Space from Add to a Space in the Home creation widget. Describe what you make in ordinary language.
Include who you are speaking to, how the videos should sound, where you publish them, and the kind of length you prefer. Scripts prepares the Space settings and may ask questions if it needs more information. Review the result before creating it.
A useful tone is specific enough to act on. “Friendly, direct, short sentences, explain unfamiliar terms” is easier to follow than “engaging and authentic.” Think about how you would recognize the right voice in a finished paragraph.
An example Space description
Tech tips for people who are new to recording videos at home. Friendly and direct. Explain unfamiliar terms, keep the steps practical, and avoid exaggerated promises. Mostly 30–60 second videos for Instagram and YouTube.
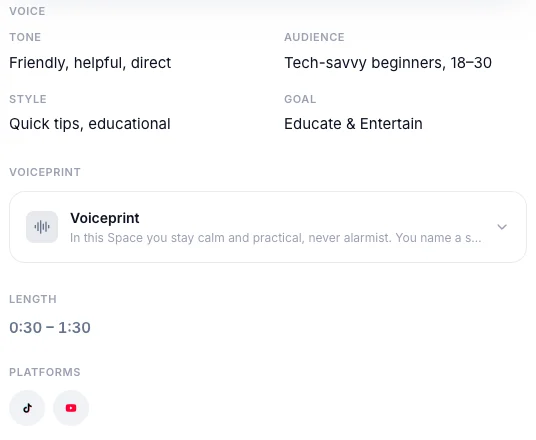
3. Select the Space before creating
On Home, choose Add to a Space and select the one that fits. Its name appears at the top of the creation widget. Then enter the idea for this particular video. The Space supplies recurring context; your brief supplies the point and details for today.
You can also start from inside a Space to create with that context. Keep client work in its own Space so you can find its scripts together and review the same voice preferences.
Attaching an existing script to a Space helps organize it, but it does not automatically rewrite the draft. If the wording needs to change, edit it or use a focused refinement request, then read the result again.
4. Let Voiceprint learn from your own words
Space settings describe the voice you want. Voiceprint adds a learned layer based on how you actually write. The current learning system uses wording you personally add or rewrite while editing scripts, and scripts you write yourself.
An untouched AI draft, an AI refinement, a saved Idea, or simply filming a take does not teach Voiceprint your writing style. When a phrase feels unnatural, replacing it yourself gives the system a more useful example of how you speak.
Voiceprint needs enough original writing before it can learn a useful pattern. A new account may show Not learned yet. That is expected. You do not need to keep pressing Refresh after every sentence.
Open Voiceprint inside a Space to review its summary and example lines. Your overall Voiceprint also lives in Account on web or Profile on mobile. Refresh can check for new wording; Reset clears the learned profile.
5. Keep different brands distinct
Check a Space’s tone, audience, and instructions when a series changes direction. Explicit Space settings take precedence over the learned voice, so update those preferences when you want a deliberate change.
A Space can inherit your overall Voiceprint. If a client or separate brand should have its own voice, turn on Separate brand in that Space so your overall voice does not influence it. On web, open Edit this Space to find the setting.
Before filming, read the script out loud and ask whether this audience would recognize the speaker. Consistency means a familiar voice across different ideas, not repeating the same opener in every video.